
This article explains how to handle editing and voiding invoices across Vital, Lightspeed, and Xero, including the manual process required due to current system limitations.
Understanding Invoice Voiding & Editing
Currently, the integration between Vital, Lightspeed, and Xero is one-way only, meaning that:
✔ New invoices sync between systems
❌ Voiding or editing an invoice does NOT sync across all three systems
Until a "void" integration is implemented, users must manually void old invoices in all three systems when a new invoice is generated.
Scenario 1: Job Sheet Change Creates a New Invoice
- When a job sheet is modified, the system automatically generates a new invoice.
- The old invoice remains in Vital, Lightspeed, and Xero, but is no longer valid.
- Action Required:
- Edit the job sheet → New invoice is created
- Manually void the old invoice in Vital, Lightspeed, and Xero.
Scenario 2: Invoice Needs Modification
- If an issued invoice requires changes, editing it creates a new invoice.Why is this necessary?
- This is an intentional fraud prevention measure. Invoices should not be directly edited without generating a new one. However, since the system does not allow automatic voiding across all platforms, manual intervention is required.
- The previous invoice remains active in all systems and must be manually removed.
- Action Required:
- Edit the invoice → New invoice is created
- Manually void the old invoice in Vital, Lightspeed, and Xero.
How to Void an Invoice in All Three Systems
- Open the invoice in Vital
- Click on the green "synced" icon to open the the invoice in LightSpeed to void in step 2.
- Click the trash can icon to void the invoice in Vital.

Important Notes:
- If the invoice has a payment attached, but the payment has not actually been received, log a support ticket to request its removal.
- Once payment is deleted, you can void the invoice in Vital.
- Navigate to the LightSpeed tab to the invoice
- Click 'View on Xero' to open the invoice in Xero to void in step 3.
- Expand the invoice
- Click Void to void the invoice.

Important Note: If a payment is attached to the invoice in Lightspeed, voiding the invoice will automatically delete the payment record in LightSpeed.
- Navigate to the Xero tab to the invoice
- Click the three ellipses next to 'Add Payment'
- Select 'Void' to void the invoice.

Important Note: If the Xero invoice has a payment linked, the payment must be removed before voiding.
Removing a Payment from an Invoice in Xero
- Navigate to the Xero tab to the invoice
- Click on the payment line link.

- Once on the payment record, click Options > Remove & Redo.
- Once the payment is removed, void the invoice as described above.

New invoices
Where a new invoice has been created, don't forget to add the payment to the new invoice. This can be done in Xero using the 'add payment' button on the invoice. The payment will sync to Lightspeed and Vital.
Reconciling & Reporting on Voided Invoices
Since invoice voiding is a manual process, there is a risk that some invoices may not be voided in all three systems, which could impact financial reporting and sales accuracy. To prevent discrepancies, review voided invoices every week to confirm they have been correctly voided in all three systems.
How to Check Voided Invoices in Each System
- Login to Lightspeed
- Navigate to Sell > Sales History
- Filter by status: "voided"
- Set the date range and click Search.
- Cross-check in Xero and Vital to confirm the invoice was also voided there.

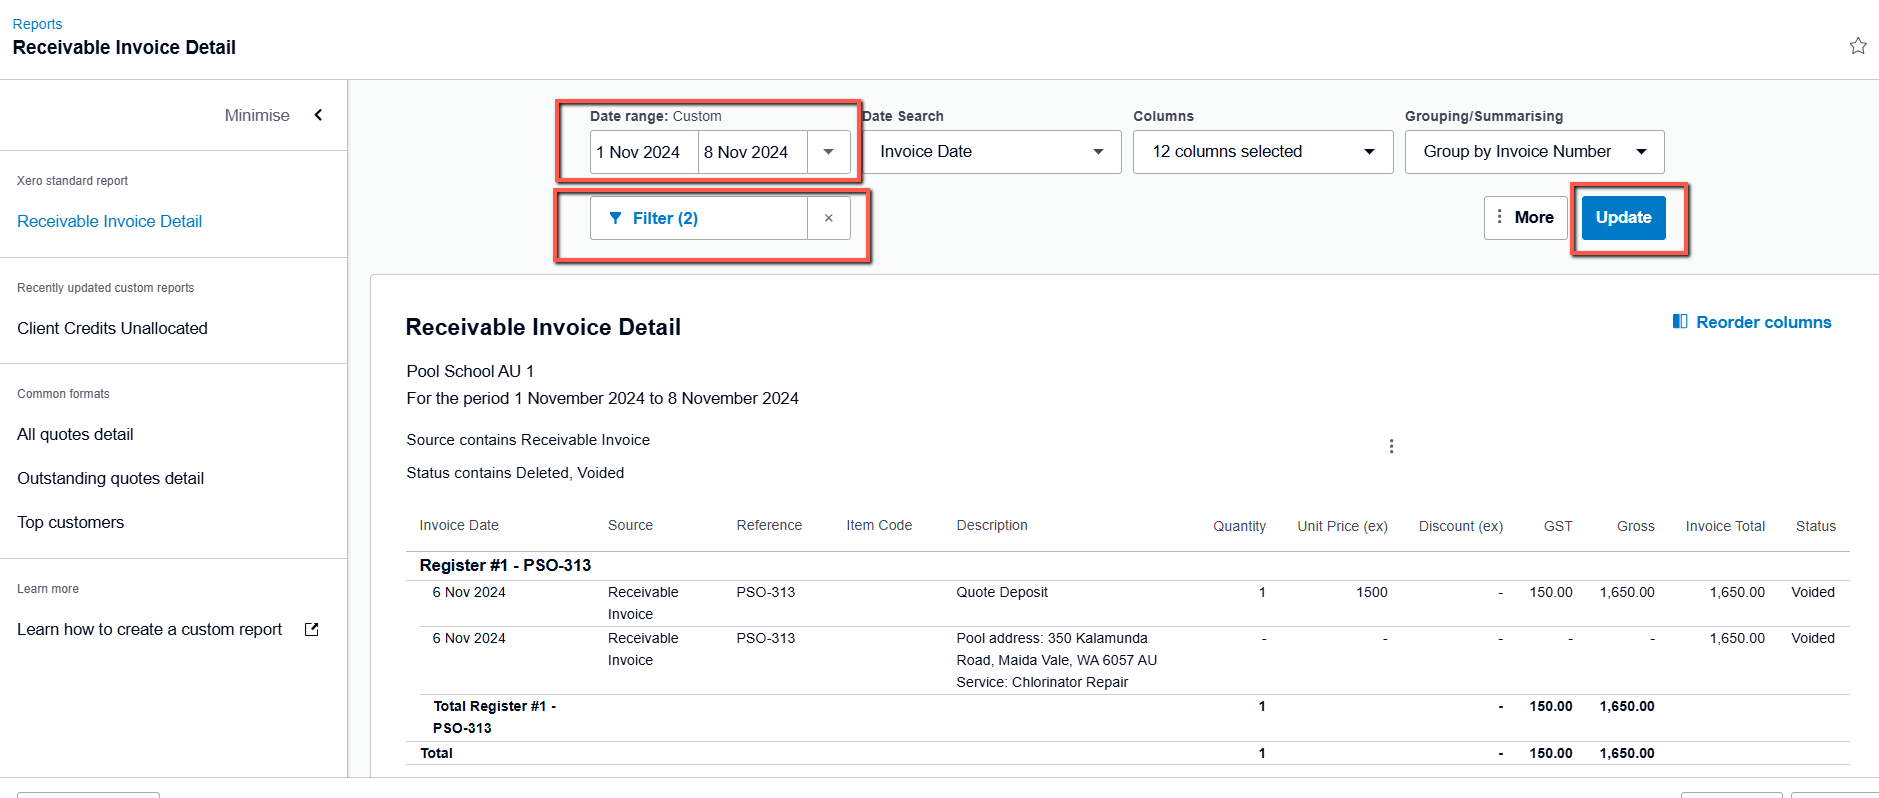
- Log in to Xero.
- Navigate to Accounting > Reports > Receivable Invoice Detail.
- Apply your desired date range.
- Click on Filter dropdown
- Click on fliter Source
- Check "Receivable Invoice" box
- Click on fliter Status
- Check "Deleted" box
- Check "Voided" box
- Click Apply filters
- Click Update
- Cross-check in Lightspeed and Vital to ensure the invoice is voided in all systems.
Since voiding invoices is a manual process, missing a step could lead to:
⚠️ Duplicate invoices remaining in one system
⚠️ Incorrect sales and financial reports
⚠️ Discrepancies when reconciling payments
While not ideal, this workaround is temporary until the project team implements a system-wide voiding solution with the vendor. If you encounter repeated discrepancies, log a support ticket for assistance.
Summary: What You Need to Do
✔ If a new invoice is created, you MUST manually void the old invoice in:
✅ Vital
✅ Lightspeed
✅ Xero
✔ Payments must be removed before voiding an invoice in Xero or Vital.
✔ Cross-check weekly to ensure invoices are voided in all three systems.
The project team is actively working on an automated voiding solution. Until then, this process is required to maintain accurate financial records.
BAS / GST reporting
Provided your previous BAS / GST reports hav been finalised in consecutive order, Xero automatically accounts for these on your next activity statement / return. Click on the guides below to learn more
Xero | How to account for voided invoices on BAS (AU)
Xero | How to account for voided invoices on GST return (NZ)